Showing posts with label do it yourself. Show all posts

Friday, April 10, 2015

This post serves as a wake up call for anybody who is still drinking store-bought almond milk.

Rise and shine! You can make your own in only two steps! Woahhh!

I made my own almond milk for the first time last week. It's long overdue that I share with you my excitement.

The idea of making something as complex sounding as almond milk, by doing virtually nothing, is pretty cool. Your friends will be impressed. Your family will be impressed. Your dog will be impressed. You don't need to tell anybody that it's actually extremely easy to make - feel free to bask in the glory of homemade almond milk.

I also made my own almond flour for the first time last week! Almond flour is just an added bonus of making almond milk. I put the almond milk and flour instructions together below because they come as a pair.

Almond Milk (and flour):

Ingredients:

~ Almonds - 1 cup

~ Water - 3 cups

~ Thin cotton fabric or cheese cloth


Instructions:

1. Blend almonds and water together in your food processor until completely combined.


2. Secure a cheese cloth (or a thin cotton cloth) around a container that the milk will go into with a rubber band. I used a big mason jar as my container. This recipe makes about 2 cups of almond milk, so keep that in mind.

3. Pour the almond milk onto the cheese cloth. The milk will drain through into the container and you will be left with some ugly looking debris on top of the cloth.


4. Take the four corners of the cloth together in your hand and ring out the extra milk. Save the ugly debris for flour!

You now have yourself some delicious homemade almond milk! There are no chemicals or additives in this tasty concoction so separation is natural. Shake well before drinking.

I would recommend drinking the milk within 4 days of making.


4. Preheat your oven to your lowest setting.

5. Spread the ugly debris on a cookie sheet and place in the oven for 2-3 hours.


6. Store in a sealed container.

You now have yourself some almond flour! Woahhh!


I love this recipe because I get two great items for the price of one cup of almonds. That's a deal I'd take any day.

Monday, March 30, 2015


I challenge you to never buy sushi again.

If you cannot accept this challenge, I understand because I will not accept it myself due to laziness. Sometimes I just really don't feel like making food. During those times I make the wise decision to buy sushi.

Let me teach you how to prepare your own sushi so that you have the option of making it if you aren't feeling so lazy.

Sushi is extremely easy to make, hence why I made it for lunch. So why would you ever be lazy enough to buy it?

Well:

~ Making sushi requires pouring some water and rice into a rice cooker, pressing the power button and watching Netflix for 20 minutes until the cooker finishes doing its thing.

~ Rolling sushi requires a tiny bit of finger strength.

Think you can handle it? GREAT. Let's get started.

But before we begin I should mention that due to lack of supplies (a bamboo rolling sheet), I opted for a clean dish towel to place underneath my seaweed. I didn't find this to be a problem at all and it's a great solution if you don't have a bamboo sheet hanging out in your kitchen.


Ingredients:

~ Sushi rice - 1/2 cup

~ Any kind of vegetable(s) you would like to add (I used cucumber and bean sprouts)

~ Seaweed sheet - 1

~ Pepper (optional)

~ Soy sauce (optional)


Directions:

1. Cook your sushi rice.

2. Fold your dish towel in half and lay it down flat. Or, if you have a bamboo sheet, lay that out flat. Place 1 sheet of seaweed on top of your towel.


3. Spread the sushi rice evenly over the seaweed. The rice is sticky so I would advise you spread it with the back of a spoon, or if you would prefer to use your hands, wet your fingers with some water to avoid sticking.


4. Shred (or chop/slice/cut) your vegetables of choice into long strips. Place the vegetables one by one in a horizontal line. They should be placed about 1 inch from the bottom of the seaweed sheet. (First photo shows cucumber, second photo shows bean sprouts added.) I chose to sprinkle some pepper onto the rice after this. The choice is yours.


5. Now you roll. Don't be scared, it's only sushi. Take the bottom of the sheet and tuck as closely to the vegetables as possible. You are essentially wrapping the seaweed around the vegetables. Then begin to roll the entire sheet into a tube, from the bottom up. Keep rolling pretty tightly.


6. Finish off the rolling and make sure the seem of the seaweed is sealed. Move the roll onto a plate.


7. Using a serrated knife, cut your sushi into evenly spaced pieces.


Congratulations! You just made your first roll! Eat with chopsticks or your fingers and dip in soy sauce if you'd like.

I love that so much can be done with sushi making. There is a never-ending variety of delicious combinations to go into a roll. Now that you know how to make some very simple sushi, don't be afraid to get creative!

Tuesday, March 24, 2015


I love working with clay for a variety of reasons. It is a naturally beautiful color, it can be molded into just about anything, it adds an earthy touch to the home and quite frankly, it's fun to squish. Working with clay can be a relaxing, solitary activity to calm any stressful thoughts from a long day of work, or it can be a fun activity to do with friends. One basic and extremely calming project is to make a pinch pot.

These pots are not too challenging to cause anybody to get upset, although personally, I could sit for hours trying to perfect the roundness.


How to make a clay pinch pot:

You will need:

~ A big block of air drying clay - You're local craft store probably supplies this. I got an 11 pound (5 kg) block of clay for $17.00, but there are smaller blocks for sale if you don't think you will use the clay often.

~ Wire clay cutter - This is just a piece of flexible, medium thick wire with two handles on either end so you can easily cut off a chunk of clay. You could make your own without too much trouble.

~ Pencil - Or any other sort of pointy object that is not too thick.

~ Small bowl of water - You may need to dip your fingers in this to keep the clay moist. After a while the clay will start to dry a little. This makes it harder to mold and a lot less fun. Nobody likes dried up clay.


Instructions:

1. The first step is to roll a ball about the size of your palm. You can get a pretty spherical shape by roughly rolling the clay in your palms and then tossing the ball from hand to hand until the clay looks nice and even. No need to be a perfectionist!

2. Smooth over any cracks with your fingers. To do this, smooth the clay horizontally over the crack until it is no longer visible.


3. Now the fun begins. With your thumb, make a hole about 3/4 deep into the center of the ball. Some clay might get under your nails, which I think is a little gross, but that's just my clean freak shining through.

4. With your thumb in the center and your other 4 fingers supporting the clay from the outside, evenly pinch all around the pot. Do not pinch too hard. You can repeat this step many times until the walls of the pot begin to thin out and the opening starts to widen.

Be careful not to pinch the top rim of the pot. The rim will start to widen on it's own.

5. By now you should have a cute little pot forming! Go back and smooth any cracks that have formed and try to keep all of the walls as evenly thick as possible.

6. Use your pencil (or other sharp and pointy object) to poke 3 tiny holes in the bottom of the pot. This is to let the excess water drain after watering the plant that goes inside. Pretty doesn't matter because the soil is going to cover any imperfections.


7. Allow your pot to air dry for 2-3 days. Keep it in sunlight to get the process going a little faster.

The clay will change to a lighter color as the pot begins to dry.

As you can see, I decided to get fancy and curve the rim of my pot outwards to create a little more shape. This is totally optional. You can do anything you want with the pot now! The pinch pot is the most basic form.

After I made my first pinch pot, I got a little excited and made a second larger pot and stuck a face on it. He is a weirdo but I am a fan.

I haven't repotted my plants yet but I will as soon as I buy more soil. Until then, enjoy this un potted plant shoved into my newly made clay pot!


Sunday, March 22, 2015

I have quietly judged people who choose not to eat a delightfully sugary cake on their birthday for all of my twenty years of existence. Today I announce that I have officially become that anti-cake weirdo. Little me is judging twenty-year-old me hardcore right now.

You all must be extremely concerned that I'm not celebrating my birthday properly, so I would just like you all to know that I did, in fact, eat a delicious cake - a raw vegan carrot cake - and it exceeded all of my expectations and then some.


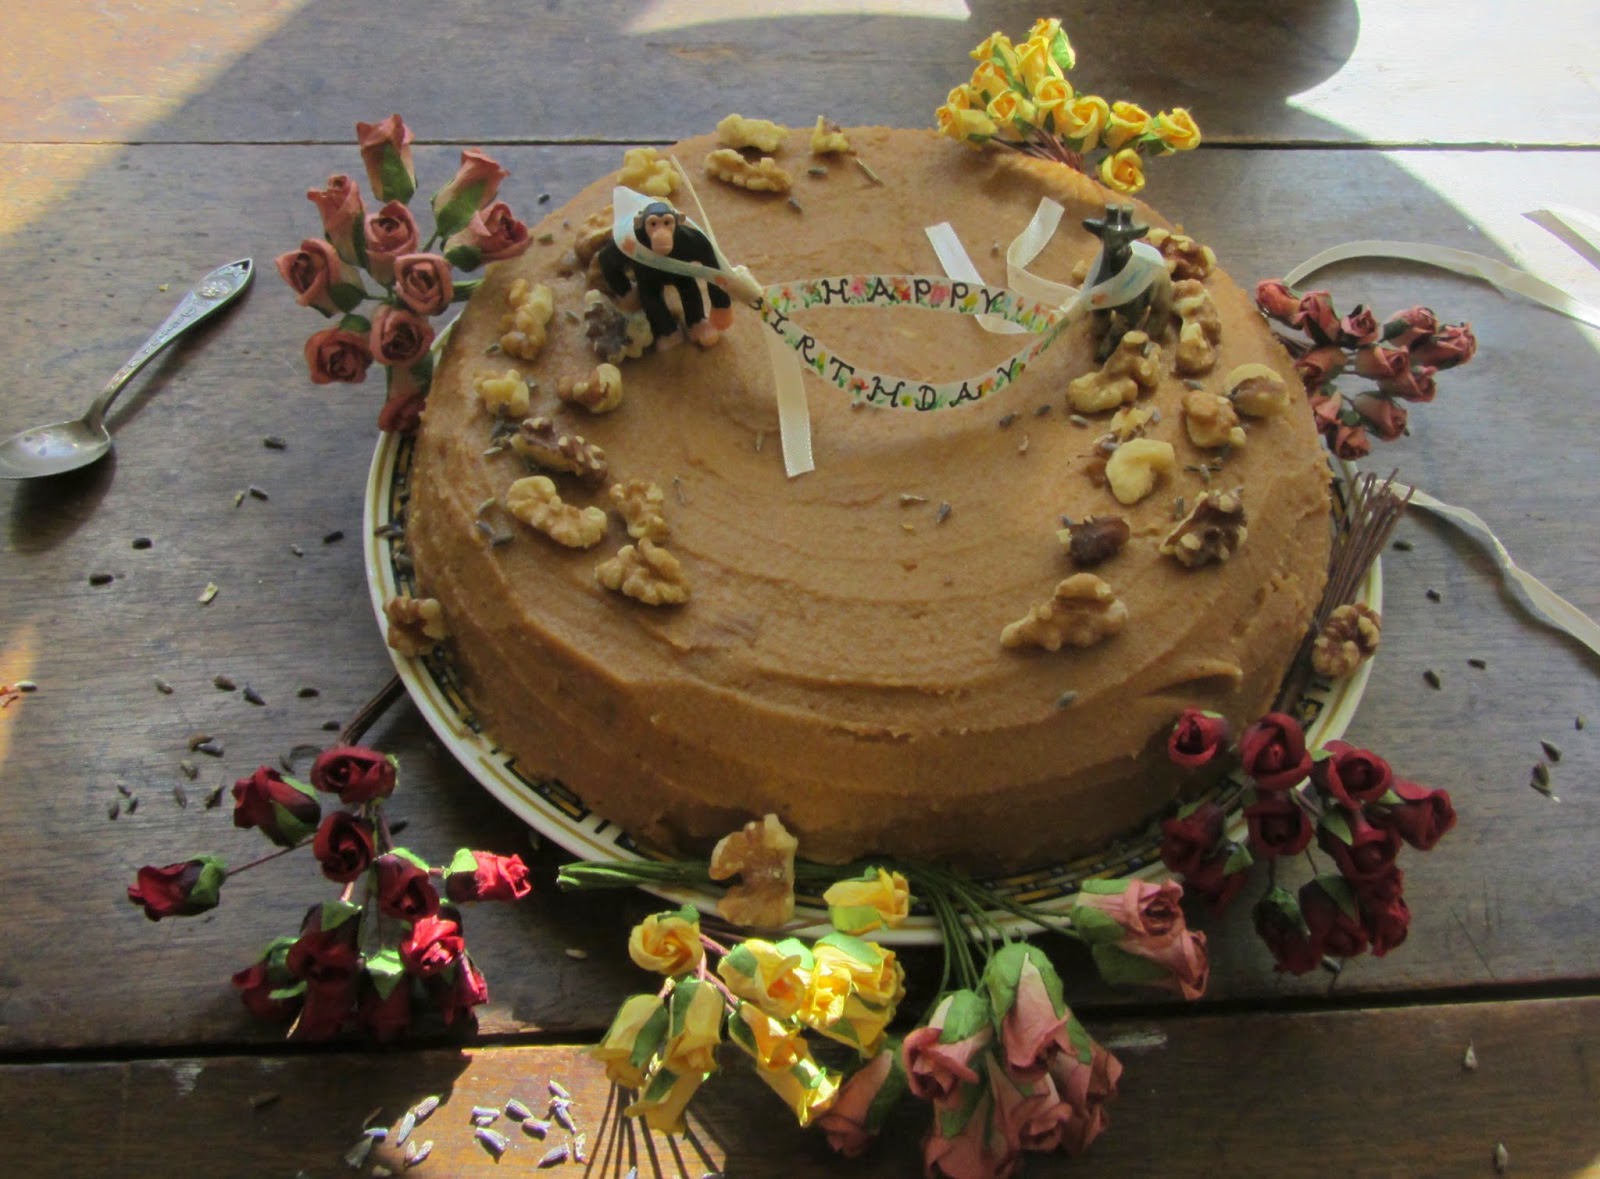
I made that??? Not to toot my own horn but I'd say that is a pretty beautiful cake in all of it's cashew-cream-cheese-and-lavender goodness.

I can happily say that I have stuck to my rules of lazy baking. If there are too many ingredients, I refuse to make it. A ton of ingredients take the fun out of raw baking and makes the whole shebang a lot more like work.

A cake that uses minimum ingredients and not too many steps doesn't seem like it would taste very good, but I assure you that it tastes exactly like a real carrot cake should taste.

This is a real carrot cake recipe. Not a processed sugary cake mix with some orange coloring and a few freeze dried carrots mixed in for good measure. 3 cheers for good food! *CHEER CHEER CHEER*


My mom came and visited for the week and the last day she was living with me was the day that this beauty was prepared. We got a little carried away with the decorations but dolling up a cake never hurt anybody! We used paper flowers, two animal figurines from a small collection I have displayed on my windowsill, lavender and walnut halves. We almost didn't want to eat the cake after making it look so pretty! Nevertheless, the cake was eaten. No problem there.


I did run into a few problems which could have been easily avoided, had I been more prepared.

1. A cheesecake tin would be great to use for this cake because it would help with easy removal. I used a normal cake tin which turned out fine. The removing of the cake was a tad more difficult than it needed to be. The middle of the cake was sticking to the tin but with a little TLC it was able to be unstuck.

2. I made the big mistake of using a Nutribullet instead of a legitimate food processor. I was able to get all of the ingredients blended together but it was a lot of work for the Nutribullet fella. He had a good workout and he survived in the end.


Ingredients:

The icing:

~ Soaked cashews - 4 cups

~ Lemon juice - 3 tbsp (4 tbsp for a cheesier bite)

~ Coconut oil - 1/4 cup (more or less)

~ Maple syrup - 2/3 cup

~ Water - 6 tbsp

~ Vanilla - 2 tbsp

~ Lavender - 3 tbsp (optional)

~ Walnuts - 1/4 cup (optional)


The cake:

~ Chopped carrots - 4 cups

~ Dried pineapple - 2 cups

~ Finely ground oat flour - 3 cups

~ Dried unsweetened coconut shreds - 1 cup

~ Water - 4 tbsp

~ Cinnamon - 1 tsp


Instructions:

The icing:

1. Put all of the ingredients into your food processor, aside from the lavender and walnuts. Blend until well combined. Your final product should be a whipped consistency.

2. Taste test and smile. Set aside.


The cake:

1. Put all of the cake ingredients into your food processor. Blend until well combined. (You've just made your batter. That didn't take too long, did it?!)

2. Spread half of the batter into a round cake tin. My tin was 23cm x 3.5cm and it all fit perfectly. About half of the cake tin should be filled.

3. Spread a generous layer of frosting onto the first layer. Put this all in the freezer until the icing has become firm.

4. Once the icing is firm, which will take about 3 hours, spread the remaining batter on top of the first layer. Your cake tin should be filled to the top now.

5. Remove the cake from the tin. This can be tricky so handle with care. I unstuck the cake from the edges of the tin with knife before attempting to remove it completely.

I would recommend using a cheesecake tin to help with easy removal.

6. Your cake should now be on a cake stand (or in my case, a plate). Generously ice the top and sides of your cake.

7. Sprinkle the lavender and walnuts onto the cake as you wish. The lavender does taste nice with the icing but the decision is yours.

8. You have made a really good carrot cake. Congratulations are in order.


Tuesday, March 17, 2015

Introducing the newest portion of the blog! Biweekly I'll be posting about a weird food that's either underrated, unheard of or unappreciated. First impressions, nutrition facts and recipes will all be posted along with some pretty pictures.


THE DRAGON FRUIT.


This is a badass fruit.

~It's hot pink
~It has polkadots
~It has leafy spikes
~It's fine
~It's fresh
~It's fierce
~It looks like a hand grenade

It's a shame more people don't eat this bad ass fruit. Maybe it's a little off-putting in all of its hot-pink-polkadot glory...that's why I'm bringing you some solid facts, a few inspiring pictures and a ridiculously easy recipe to introduce you to your new favorite food.


Which part of it is edible?:

~ Eat the black and white part as shown in the picture. (Dragon fruits can also be a deep red with black polkadots.)

~ The skin is not edible.

~ There is a thin white layer between the skin and the flesh. This is bitter and gross. Avoid at all costs.


How should a dragon fruit be cut?:

~ Cut vertically down the center of the fruit as shown above.

~ The flesh can be scooped out with a spoon, an ice cream scooper, or diced.


What does it taste like?:

~ The colors may be bold but the taste is mild.

~ Very juicy.

~ Think of a cross between a kiwi and a pear.


How should it be served?:

~ On it's own

~ In a fruit cup

~ In a smoothie bowl

~ As a sorbet

~ In a smoothie

~ With oatmeal

~ With cake

~ With rice pudding (healthy recipe coming soon)

~ The possibilities are endless


RECIPE
Dragon fruit sorbet

Ingredients:

1. Dragon fruit - frozen for at least 3 hours, preferably overnight

2. Coconut milk - 2 tbsp (optional)


Directions:

1. I wasn't kidding when I said this was easy. Put the dragon fruit in your food processor and blend until a sorbet-like consistency has been reached. Adding coconut milk will make the sorbet creamier.

2. I served mine with a scoop of banana ice cream. Enjoy!

Tuesday, February 24, 2015

Here's a little room inspiration to make you want to redecorate...sorry not sorry.


1. I love the composition of this room. The orange against the blue wall, the dainty velvet couch, the frame arrangement, those blue lamps...ooh lala.

2. No commentary needed but I'll comment anyway. That THROW! The colors and the texture are beautiful. I also love the painting above the bed - I want to paint something like that with one of my pets in the center. The paintings on either side of the bed add a little something extra. It's nice that the lamps are two different sizes because it throws the symmetry off a bit.

3. Calming, eh?

4. I love the wall color for a bedroom. People seem to steer clear of colder grays like that for the bedroom but this looks gra(y)t. Ha ha. The fur pillows have the same shade of gray which makes the bed fit in the space better. The pink adds warmth and flowers should be in every room of the house. The artwork is interesting and the gold frames add another coziness factor.

5. This is actually a studio apartment. The glass folding room divider adds an element of privacy without making the already small studio appear even smaller. The floral wallpaper is fun and picks up color from the headboard and opposite wall. The white bedsheets add freshness to keep the room appearing clean and uncluttered.

6. That desk is a DIY that I have been meaning to do for the longest time! Maybe this spring I will actually do it. Check out the link: http://littlegreennotebook.blogspot.ca/2013/04/diy-faux-malachite.html

7. Just a fabulous pillow.

8. More gray walls, velvet and fur! Hm... I love the color scheme and the rug. The chandelier above the bed is a great alternate light source and adds sparkle. The artwork adds to the space without taking over. The metallic gold looks great with the light fixture - they play off of each other.

9. This is more of the vibe of my current apartment. Lots of white and lots of light. I love the plants and the golden light fixture. I have a thing for layered rugs and that tiger rug is too cute. More fur on the bed, of course. The hardwood floors look nice with all of the white. Every room looks better with a little life like those big leafy plants in the corner.

10. These are oversized cushions designed in the shape of stones - 100% Merino wool and 100% awesome. By textile designer Ronel Jordaan. He's South African... that explains the coolness factor.

Feeling inspired yet?

Wednesday, February 18, 2015


Feeling blue? Like you have no purpose in life? Like everything is falling down around you? Never fear, just buy a cactus!

Water these babies once a month and you're good to go. They look pretty all year long, they're extremely low maintenance and there are more than 2,000 different kinds!

Don't want one? Fine. More for me.


These cuties were being sold for just $8 - make that $7.99 because every penny counts - at my local grocery store! The deal was too good to be true so I happily bought one and welcomed it to the family. I really should have taken full advantage of the deal and bought more than one.


This is love.


Sunday, November 16, 2014

Canadian weather doesn't fool around. It's barely 30 degrees here and snow has been falling all day long. The sad part is, I think it may be colder inside my apartment than it is braving the great outdoors! For dinner I knew I needed to make something that would keep me warm. I planned on making a simple but delicious chickpea curry (I know you must be dying to read about that, so recipe coming soon *wink wink*). After a series of unfortunate events and a sad realization that my can opener had broken, I decided that chickpea curry was not an option tonight. I didn't realize this until after I started making the coconut rice. So now I had some rice boiling while I sat on my kitchen counter in a slump. Cue inspiring pictures of food and a lot of disappointment when I realized a good chunk of the recipes required a can opener. No worries, this story has a happy ending. After about 10 minutes of feeling uninspired by food inspiration, an idea was born! A coconut rice bowl with a fried egg and avocado. So easy, ay yai yai!

I'll save you ten minutes of your life by giving you the blatantly obvious recipe below. No uninspiring food searching for you, my friend!


Coconut Rice Bowl

Ingredients:

~ Coconut milk - 1/2 cup

~ Jasmine rice - 1/2 cup

~ Avocado - 1/2

~ Egg - 1

~ Salt

~ Pepper


*no duh* Instructions

1. Begin cooking the jasmine rice with 1/2 cup water and 1/2 cup coconut milk.

2. While the rice is cooking, fry an egg.

3. Cut your avocado.

4. Put the rice, avocado and egg into a bowl. Add salt and pepper as you wish.

Take your first bite...WOW party in your mouth! I bet you weren't expecting such deliciousness to come out of such a simple recipe! Ah, the beauty of laziness. This bowl will keep you satisfied for a long time after you've finished eating as well.

Sunday, August 17, 2014

I have a thing for making butters. It's so fun, so simple, extremely easy and half the price of buying it from a store. Why anybody would ever buy butter really baffles me. I don't think people realize how simple it is!

I've made a few different kinds of butters; Almond, macadamia, chocolate macadamia, hazelnut, chocolate hazelnut (do you see a pattern?) and now sunflower seed butter. The beauty of making butters yourself is there are no added preservatives or other unnecessary ingredients. You know exactly where the nuts are coming from, you're saving money, it's probably healthy than what you're buying in the store and you can store it in cute jars!

I hadn't actually had sunflower seed butter before but I always see it as ingredients needed for recipes I want to try. It can be a pricey butter to buy in stores and I decided to make it myself. It has a nice sweet taste with a touch of salt. I think it tastes great in oat meal or just on a slice of toast, also on it's own with a spoon. ;)

Homemade Sunflower Seed Butter:

Ingredients:
~ Raw or roasted sunflower seeds - 1 cup
~ Coconut oil - Give or take 1 tablespoon
~ Salt - 1 pinch

1. Pour the sunflower seeds into your blender and blend until the seeds begin to clump together in a slightly powdered buttery form. This can take a while so be patient. You may need to occasionally scrape the side of the blender.

2. Add 1 tablespoon of coconut oil and blend some more. The extra bit of oil will help the butter get to a delicious creamy consistency. Next mix in a pinch of salt.

3. When the sunflower seeds have turned to butter (Trust me, it will. Just be patient.) you can now take a taste! Add a little more salt if you'd like, maybe a little honey if you want it sweeter but I don't think it needs any. Whatever floats your boat.

4. Pour into a jar and keep stored in your pantry! No refrigeration required. The butter lasts about 2 1/2 weeks but I wouldn't been surprised if you finish it sooner than that. Enjoy :)


//

//

Popular Posts

'Holding On To Anger Is Like Drinking Poison And Expecting The Other Person To Die.' ~Buddha

'No one saves us but ourselves. No one can and no one may. We ourselves must walk the path.' ~Buddha