Showing posts with label coconut. Show all posts

Monday, August 17, 2015

Are you aware that squash is considered a fruit? Does that blow your mind? My mind is blown.

Can you guess what fruit this curry contains? Have I asked enough questions yet?


Sweet Curry
(with squash, sweet potatoes, carrots and mushrooms)
(with a side of kale if your tryna get those greens)

Ingredients:

~ Coconut milk - 2 cups

~ Squash - 1 whole

~ Sweet potato - 2 whole

~ Carrots - 3 whole

~ Mushrooms (I used cremini)- 3/4 cup sliced

~ Turmeric - 1 tbsp

~ Cumin - 1/2 tbsp

~ Cayenne pepper - 1/2 tbsp

~ Ginger - 1 tbsp minced

~ Garlic - 1 1/2 to 2 cloves, minced

~ Cilantro - 1 pinch, chopped (optional)

~ Rice - 1 cup (optional)

~ Kale - 1/2 cup (optional)

Directions:

1. Dice the squash, sweet potatoes and carrots.


2. Bring a giant pot of water to a boil. Enough water to cover all of the food you are about to put in.

3. When the water has begun boiling, first add the squash, then sweet potatoes and then carrots. Do so in a timely manner, as they each take slightly different amounts of time to cook through:


Squash - 15 to 20 minutes

Sweet potato - 10 to 15 minutes

Carrots - 7 to 10 minutes


4. Once boiling is complete, strain water and let sit.


5. In a gigantic pan (you're making a lot of food here), bring coconut milk, ginger and garlic to a boil.


6. Add the turmeric, cumin and cayenne pepper. Let simmer with a lid on for 7-10 minutes, stirring occasionally.


7. Taste the coconut milk and make sure you are satisfied with the spices. Add more if your heart desires. A little extra spice never hurts. *wink*

8. Add the squash, sweet potato and carrots to the pan. Toss in the sliced mushrooms and mix all ingredients together.


*Your curry should look something like this:


9. Let the curry simmer with a lid on for 15-20 minutes, stirring every once in a while.

You just made curry in only 9 steps! Woo! If you want to make the bowl shown above, keep reading.

10. While the curry is simmering, why not make some rice to go with it? I used jasmine rice with a 1 to 1 3/4 ratio.

11. When the rice is almost finished cooking, add kale to allow the steam to soften.

12. Put rice, curry and kale into a bowl. Sprinkle with cilantro. BOOM you're done.

Sunday, July 5, 2015

You better believe me when I tell you that this pie is delicious. Otherwise you'll just have to make it and see for yourself. Don't be thrown off by the list of ingredients. They're all healthy and wholesome - one ingredient just happens to be tofu. Hehe.

You will not taste the tofu. Only goodness.

Make, eat, enjoy.


Healthy Coconut Cream Pie

Ingredients:

~ Tofu - 1 cup

~ Coconut shreds - 1 cup plus 3/4 cup

~ Maple syrup - 1/4 cup

~ Vanilla - 1 1/2 tbsp

~ Coconut oil - 2 tbsp plus 1 tbsp

~ Nuts (Walnuts, almonds, cashews or a combination) - 3/4 cup

~ Dates - 1/2 cup

~ Cinnamon - 1 pinch (optional)

Instructions:

1. First thing's first. Preheat the oven to 350F.

2. Now you are going to make the pie crust. The pie crust is made from the nuts, 1 tbsp of the coconut oil, the optional cinnamon and 3/4 cup of the coconut shreds. Put these 3 (or if you're using cinnamon, 4) ingredients into your food processor and blend until well combined.

3. Spread the crust evenly into the bottom of the pie tin. The crust should come up the sides a tid bit, like any normal pie crust would.

4. Place the crust in the freezer for 30 minutes to let harden.

5. While you are waiting on the crust, make the pie filling. Take the tofu, 1 cup of coconut shreds, maple syrup, vanilla and 2 tbsp of coconut oil and place all of these ingredients into the food processor.

6. Blend until well combined. The mixture should be very creamy.

7. Pour the mixture evenly into the pie crust and place all of this into the oven for 30 minutes.

8. Take the pie out of the oven, sprinkle a little coconut on top and place the pie back into the oven for another 7-10 minutes.

9. Place the pie in the refrigerator for at least 45 minutes before eating. The center of the pie needs time to set and the crust needs time to harden again.

10. You have just made coconut cream pie in 10 easy steps! Woo!

Thursday, May 7, 2015

I love slices but I am not a fan of making them due to the clean up. Not that the clean up is that bad, but since my tiny apartment doesn't have a dishwasher and I have to clean my food processor by hand, I tend to steer clear of recipes that require them.

So why am I giving you the recipe for a slice if I don't even like to make them? This one doesn't require a food processor! *round of applause* *joyful dancing*


Rest assured, this recipe is extremely simple (as all the recipes that I post tend to be) so you can make this hassle free.

Why should you make this slice other than the fact that it doesn't require a food processor? Well, it's the perfect combination of savory and sweet. The coconut compliments the chocolate, the chocolate compliments the almonds, the almonds compliment everything. It's the perfect combination.

So let's get right to it, shall we?

Coconut Almond Slice

Ingredients:

~ Shredded coconut - 2 cups

~ Coconut oil - 4 tbsp (for the coconut), 1/2 cup (for the chocolate)

~ Coconut sugar - 1/2 cup

~ Vanilla - 2 tbsp (for the coconut), 1 tbsp (for the chocolate)

~ Maple syrup - 1/4 cup

~ Cacao powder - 1 cup

~ Almonds (pre sliced or slice your own) - 1 handful

~ Salt - 2 pinches (for the coconut), 1 pinch (for the chocolate)

Instructions:

1. First you are going to make the chocolate. Click here for the really easy recipe. It will take you about 90 seconds to make it. Once it's been all mixed together, lay almost all of it out (save a little extra for drizzling on top of the slice) in a flat pan. This is going to be the base of the slice.

If you thought you were thinking ahead by putting the first layer in the freezer, do no such thing! That time will come but it's not yet.


2. Next you are going to make the coconut layer. I found this layer really enjoyable to make for some reason. Probably because it doesn't require a food processor. *more joyful dancing*. Mix the shredded coconut, coconut oil, vanilla, maple syrup and salt in a large bowl.


3. This is the step that you will put the first layer (the chocolate) in the freezer. Freeze for about 2 minutes, or until the chocolate is firm but not completely hardened.

4. Take the first layer out of the freezer and evenly spread the coconut on top.


5. Put the sliced almonds on top of the coconut layer and gently press them into the coconut. This is just so they will not fall off as easily when the slice is being cut.


6. Drizzle the remaining chocolate on top of the almonds.

7. Place the slice in the freezer for 30 minutes or more.

8. Slice into bars and enjoy!


Mmmm.

Thursday, April 16, 2015


According to Google, granola is defined as 'a kind of breakfast cereal consisting typically of rolled oats, brown sugar or honey, dried fruit ad nuts.'

The granola you are about to enjoy consists of none of those ingredients! Okay, maybe this recipe is not considered the real deal granola, but it's so delicious and tastes so similar that I am going to say it is.

Feel free to make these into bars or anything else you can think up. You could totally put these in a bunny mold and hand out granola bunnies to everybody you know instead of boring old chocolate bunnies. Live life on the wild side.

Store these cups in the freezer. Otherwise they will completely fall apart because coconut oil is one of the main ingredients that holds them together.

Granola Cups

Ingredients:

~ Almonds - 1 cup

~ Unsweetened shredded coconut - 1 3/4 cups

~ Carob powder - 1/2 cup

~ Carob chips - 1/4 cup

~ Dates - 1 cup

~ Coconut oil - (melted) 3/4 cup

~ Salt - 1 pinch


Instructions:

1. Pulse almonds in your food processor until they are roughly chopped up.

2. Add dates and blend until well combined.

3. Add coconut, carob powder and salt. Pulse until combined.

4. Move ingredients to a mixing bowl and stir in the melted coconut oil and carob chips.

5. Spoon the goodness into a cupcake tin.

6. Allow to harden in the freezer for 3-4 hours.

Enjoy your granola-free granola cups!

Saturday, April 11, 2015

I'd like to dedicate this post to all of the people out there who are struggling with a sweet tooth or two. I wholeheartedly feel for you.

While I was living in New York, I found the most amazing macaroon cafe. I walked inside, completely in awe of all of the macaroons, struggled to choose between the amazing colors and flavors, chose two (because how could I choose just one?), took a bite. Just like that, I was hooked.

Unfortunately I forgot the name of the place, hence I could never return. The cafe was forever lost in an array of adorable shops somewhere on the west side. Sorry to dampen your mood with the sad ending.

The point is, I've loved macaroons ever since. Allow me to introduce to you raw vegan gluten-free macaroons #cleaneating #plantbased #lifestyle. Ya feel?

These beauties will have even the biggest sweet teeth of all (I'm talking sweet molars and wisdom teeth) satisfied. Think white chocolatey coconut goodness.


Clean Eating Macaroons:

Ingredients:

~ Raw almonds - 1 cup

~ Shredded coconut - 1 cup

~ Vanilla - 1/4 cup

~ Coconut oil - 3 tbsp

~ Maple syrup OR raw honey - 3 tbsp

~ Salt - 2 pinches


Instructions:

1. In your food processor, blend all of the ingredients together. The end result should look well blended with small bits of almonds mixed in.

2. With your hands, roll bite-sized balls and place on a cookie sheet. I pressed lightly on the tops of each macaroon to flatten them a little bit. This is just for looks and is entirely unnecessary.

3. Rinse or lick your fingers because they will be pretty messy at this point.

4. Place in freezer until firm.


*I should mention that macarons are actually the delightful french pastries that come in an array of pretty colors and have a fluffy texture, similar to biting into a cloud that came straight from heavens. Macaroons are the coconut goodness for which I have given a recipe above. This is if you want to get really specific, but for the sake of this post, they're both going under the same category. To-may-to, to-mah-to.

Photo via Pastry Gene

Sunday, March 29, 2015

Or more properly titled: Healthy Vegan Crunch Bars of Doom


Fair warning: These bars will turn you into a monster and you will devour them all within the hour.

Everybody loves the classic Nestle Crunch Bar. Not everybody loves the ingredients. With a list including Soy Lecithin, Vanillin and Sugar, I decided to make my own version of the tasty bar. Now you can munch and crunch all day long without a care in the world. *Happy sigh of relief*


Ingredients:

~ Cacao powder - 1/2 cup

~ Coconut oil - 1/2 cup (melted)

~ Coconut sugar - 1/4 cup OR Maple syrup - 1/4 cup

~ Brown rice cereal - 1 cup

~ Vanilla extract - 1 tbsp

~ Himalayan pink salt - 1 pinch


Instructions:

1. Mix the melted coconut oil, cacao powder, coconut sugar (or maple syrup), vanilla extract and himalayan pink salt in a medium sized bowl. Mix until well combined. Side note: this is your basic recipe for healthy chocolate!

2. Pour your brown rice cereal into the bowl and stir until all of the cereal has been covered in a tasty coat of chocolate.

3. Evenly pour the mixture into either a pan, glassware container, or whatever else floats your boat. I used a 4X6 inch glassware container to create a thicker bar.

4. Place the container in the freezer for 1 hour, or until hardened. Slice and devour.


Sunday, March 22, 2015

I have quietly judged people who choose not to eat a delightfully sugary cake on their birthday for all of my twenty years of existence. Today I announce that I have officially become that anti-cake weirdo. Little me is judging twenty-year-old me hardcore right now.

You all must be extremely concerned that I'm not celebrating my birthday properly, so I would just like you all to know that I did, in fact, eat a delicious cake - a raw vegan carrot cake - and it exceeded all of my expectations and then some.


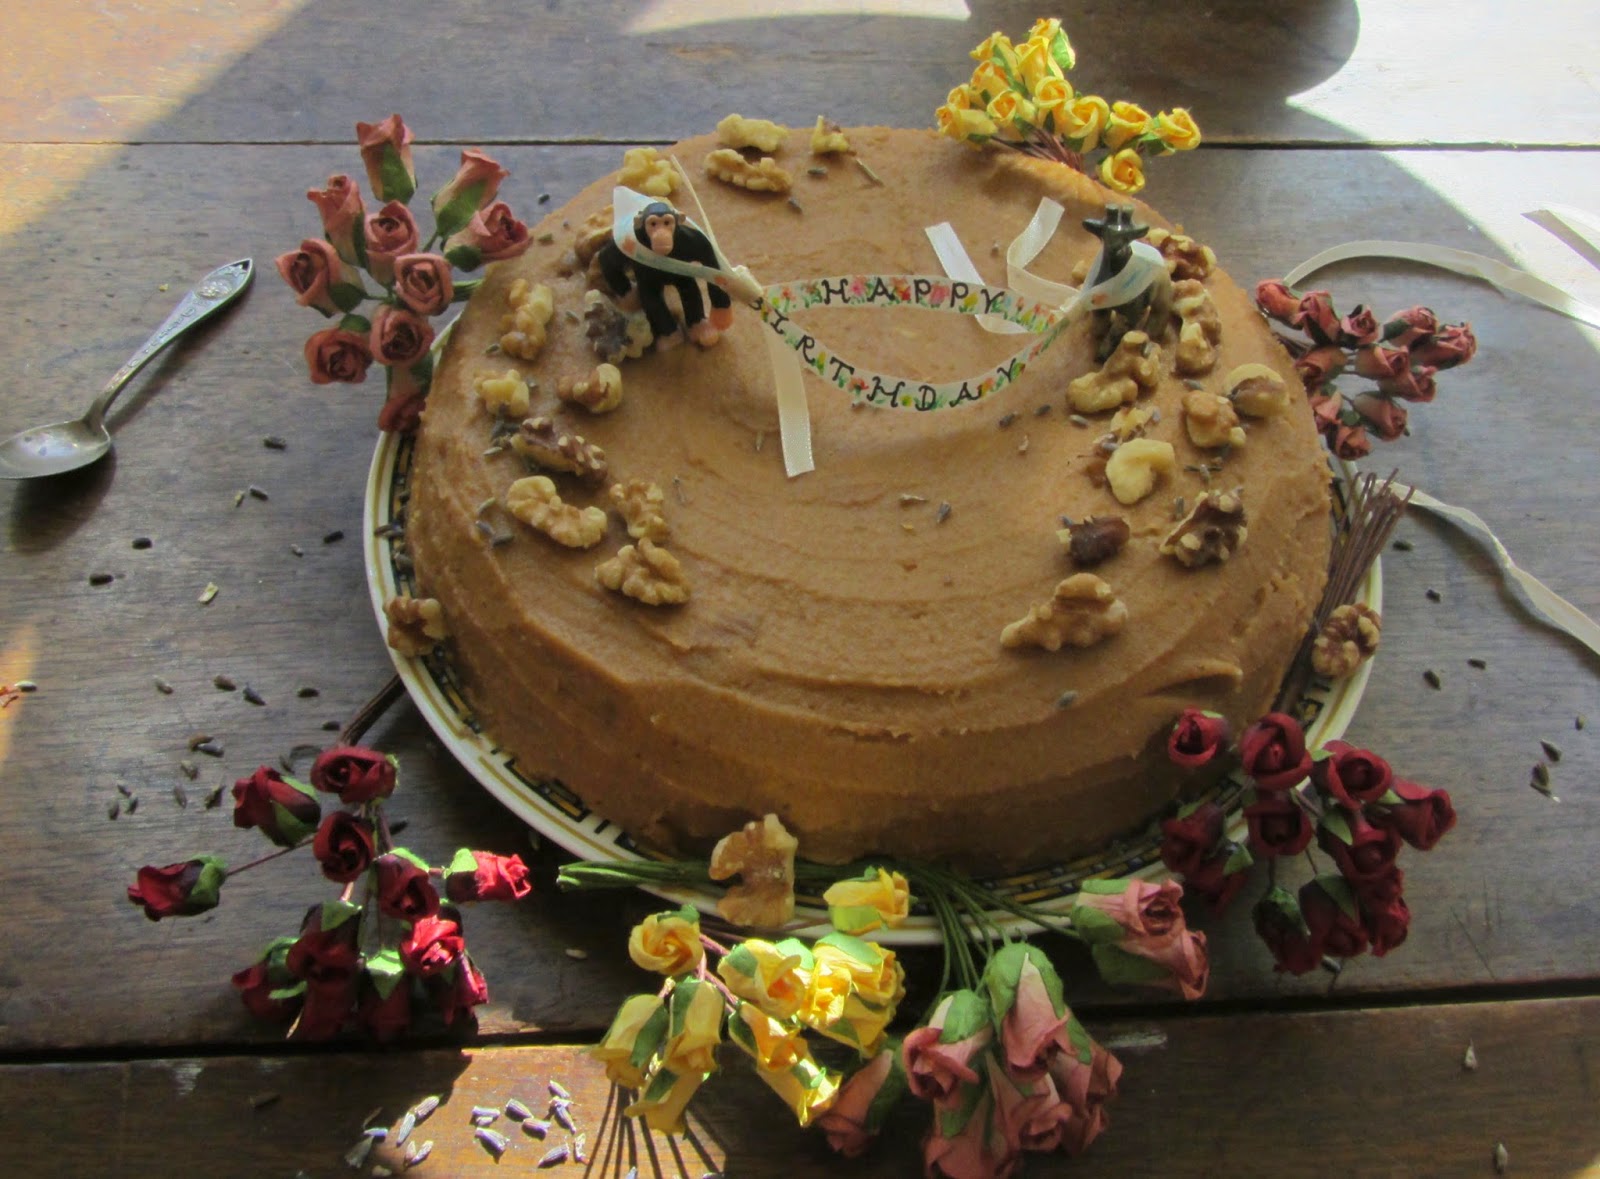
I made that??? Not to toot my own horn but I'd say that is a pretty beautiful cake in all of it's cashew-cream-cheese-and-lavender goodness.

I can happily say that I have stuck to my rules of lazy baking. If there are too many ingredients, I refuse to make it. A ton of ingredients take the fun out of raw baking and makes the whole shebang a lot more like work.

A cake that uses minimum ingredients and not too many steps doesn't seem like it would taste very good, but I assure you that it tastes exactly like a real carrot cake should taste.

This is a real carrot cake recipe. Not a processed sugary cake mix with some orange coloring and a few freeze dried carrots mixed in for good measure. 3 cheers for good food! *CHEER CHEER CHEER*


My mom came and visited for the week and the last day she was living with me was the day that this beauty was prepared. We got a little carried away with the decorations but dolling up a cake never hurt anybody! We used paper flowers, two animal figurines from a small collection I have displayed on my windowsill, lavender and walnut halves. We almost didn't want to eat the cake after making it look so pretty! Nevertheless, the cake was eaten. No problem there.


I did run into a few problems which could have been easily avoided, had I been more prepared.

1. A cheesecake tin would be great to use for this cake because it would help with easy removal. I used a normal cake tin which turned out fine. The removing of the cake was a tad more difficult than it needed to be. The middle of the cake was sticking to the tin but with a little TLC it was able to be unstuck.

2. I made the big mistake of using a Nutribullet instead of a legitimate food processor. I was able to get all of the ingredients blended together but it was a lot of work for the Nutribullet fella. He had a good workout and he survived in the end.


Ingredients:

The icing:

~ Soaked cashews - 4 cups

~ Lemon juice - 3 tbsp (4 tbsp for a cheesier bite)

~ Coconut oil - 1/4 cup (more or less)

~ Maple syrup - 2/3 cup

~ Water - 6 tbsp

~ Vanilla - 2 tbsp

~ Lavender - 3 tbsp (optional)

~ Walnuts - 1/4 cup (optional)


The cake:

~ Chopped carrots - 4 cups

~ Dried pineapple - 2 cups

~ Finely ground oat flour - 3 cups

~ Dried unsweetened coconut shreds - 1 cup

~ Water - 4 tbsp

~ Cinnamon - 1 tsp


Instructions:

The icing:

1. Put all of the ingredients into your food processor, aside from the lavender and walnuts. Blend until well combined. Your final product should be a whipped consistency.

2. Taste test and smile. Set aside.


The cake:

1. Put all of the cake ingredients into your food processor. Blend until well combined. (You've just made your batter. That didn't take too long, did it?!)

2. Spread half of the batter into a round cake tin. My tin was 23cm x 3.5cm and it all fit perfectly. About half of the cake tin should be filled.

3. Spread a generous layer of frosting onto the first layer. Put this all in the freezer until the icing has become firm.

4. Once the icing is firm, which will take about 3 hours, spread the remaining batter on top of the first layer. Your cake tin should be filled to the top now.

5. Remove the cake from the tin. This can be tricky so handle with care. I unstuck the cake from the edges of the tin with knife before attempting to remove it completely.

I would recommend using a cheesecake tin to help with easy removal.

6. Your cake should now be on a cake stand (or in my case, a plate). Generously ice the top and sides of your cake.

7. Sprinkle the lavender and walnuts onto the cake as you wish. The lavender does taste nice with the icing but the decision is yours.

8. You have made a really good carrot cake. Congratulations are in order.


Wednesday, March 18, 2015

I am a big fan of making bite sized snacks like this because they're easy and require minimum work. All you have to do is put the ingredients in your blender and the machine does the rest. The most exciting part (in my opinion) is that although they are raw, they don't need to be frozen! It's nice to have a treat every once in a while that isn't freezing cold. Otherwise I would eat banana ice cream every day!

These little guys are soft to the touch and refreshingly zesty. Eat up!


Orange Cranberry Coconut Bites

Ingredients:

~ Dates - 1 cup

~ Unsweetened desiccated coconut - 1/2 cup + 1/4 cup for rolling

~ Orange juice - 1/4 cup

~ Dried cranberries - 1/4 cup


Instructions:

1. Blend the dates in your food processor until they are finally chopped.

2. Add the coconut and blend until just combined.

3. Add the orange juice and cranberries. Blend until well combined.

5. Roll into bite sized balls and cover in the remaining coconut.

6. Munch munch, chomp chomp.


Refrigerate these little guys if you aren't planning on eating them all at once. These keeps them more firm - plus there's some OJ in there so let's keep it fre$h.

Tuesday, March 17, 2015

Introducing the newest portion of the blog! Biweekly I'll be posting about a weird food that's either underrated, unheard of or unappreciated. First impressions, nutrition facts and recipes will all be posted along with some pretty pictures.


THE DRAGON FRUIT.


This is a badass fruit.

~It's hot pink
~It has polkadots
~It has leafy spikes
~It's fine
~It's fresh
~It's fierce
~It looks like a hand grenade

It's a shame more people don't eat this bad ass fruit. Maybe it's a little off-putting in all of its hot-pink-polkadot glory...that's why I'm bringing you some solid facts, a few inspiring pictures and a ridiculously easy recipe to introduce you to your new favorite food.


Which part of it is edible?:

~ Eat the black and white part as shown in the picture. (Dragon fruits can also be a deep red with black polkadots.)

~ The skin is not edible.

~ There is a thin white layer between the skin and the flesh. This is bitter and gross. Avoid at all costs.


How should a dragon fruit be cut?:

~ Cut vertically down the center of the fruit as shown above.

~ The flesh can be scooped out with a spoon, an ice cream scooper, or diced.


What does it taste like?:

~ The colors may be bold but the taste is mild.

~ Very juicy.

~ Think of a cross between a kiwi and a pear.


How should it be served?:

~ On it's own

~ In a fruit cup

~ In a smoothie bowl

~ As a sorbet

~ In a smoothie

~ With oatmeal

~ With cake

~ With rice pudding (healthy recipe coming soon)

~ The possibilities are endless


RECIPE
Dragon fruit sorbet

Ingredients:

1. Dragon fruit - frozen for at least 3 hours, preferably overnight

2. Coconut milk - 2 tbsp (optional)


Directions:

1. I wasn't kidding when I said this was easy. Put the dragon fruit in your food processor and blend until a sorbet-like consistency has been reached. Adding coconut milk will make the sorbet creamier.

2. I served mine with a scoop of banana ice cream. Enjoy!

Friday, March 6, 2015

Everybody in their right mind loves Girl Scout Cookies. They're tasty and adorable little girls sell them to you. Unfortunately they're also full of sugar. Brown sugar, cane sugar, invert sugar.

What if I told you that you could have the cookies without all of the unhealthy ingredients? Well sit down and take a deep breath because you can have the cookies without all of the unhealthy ingredients.


I chose to make these as bars because I was too lazy to make them into cookie form. Nonetheless, they were magically delicious. The rich flavor makes one or two of these bars enough. While it's perfectly fine to eat more because all of the ingredients are healthy, you can make these last for quite a while without devouring all at once.

Ingredients:

Base:

1. Walnuts - 2 cups
2. Unsweetened coconut - 1 cup
3. Raw honey - 1/4 cup
4. Vanilla extract - 1 teaspoon (but a little more never hurt anybody)
5. Sea salt - 2 pinches

Coconut Caramel:

1. Dates - 1 1/2 cups (soaked)
2. Canned coconut milk - 1/2 cup
3. Vanilla extract - 1 teaspoon
4. Sea salt - 1 pinch
5. Unsweetened coconut shreds - 1 1/2 cups

Chocolate:

1. Dark chocolate - melted
2. Unsweetened coconut shreds - 1/8 cup

Instructions:

Base:


1. Place the walnuts and the coconut in your food processor and blend until you have a crumby mixture.

2. Add the raw honey, vanilla extract and sea salt and blend until well combined. A nice dough should be formed.

3. Press the dough into pan. Parchment paper is recommended but not required. I was out of parchment paper so I didn't bother but it helps when serving.


Coconut Caramel:

1. Preheat your oven to 350 degrees and toast the unsweetened coconut shreds for 8 minutes. Then remove and let cool while you complete the next step.


2. In your food processor, blend dates until a soft dough is formed.

3. Add the canned coconut milk, vanilla extract and sea salt. Blend until well combined.

4. Pour in the unsweetened coconut shreds and pulse until just combined. Optionally you could hand stir for a more textured consistency.


5. Spread caramel on top of the base. Store in freezer for 15-20 minutes. After freezing, the caramel will be firm but still soft.


Dark chocolate:


1. Melt dark chocolate in a small bowl in 20 second intervals.

2. Dip base of the bars into the chocolate and place them base-side-up on a cookie sheet.

3. Refreeze for 7-10 minutes, until the chocolate is hardened.

3. Flip the bars over and drizzle remaining melted chocolate onto the caramel coating. You may need to remelt the chocolate. To drizzle, I used a spoon but you could alternatively pour the chocolate into a plastic bag, cut the corner and squeeze onto the caramel.

4. Add a pinch of coconut to the top of each bar. Sing songs of joy. The Samoa bars are complete.

//

//

Popular Posts

'Holding On To Anger Is Like Drinking Poison And Expecting The Other Person To Die.' ~Buddha

'No one saves us but ourselves. No one can and no one may. We ourselves must walk the path.' ~Buddha